Monolid Eyes · Wispy · Classic 1:1
The wispy lash map for monolid eyes, built in Classic 1:1 — zone order, where the length peaks, and the point this one usually goes wrong.
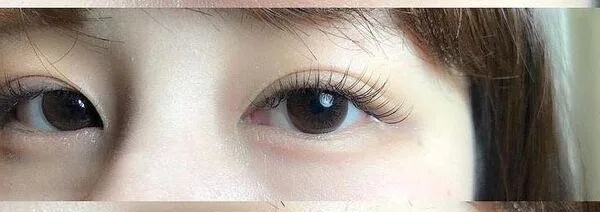
- ShapeMonolid — flat lid plane, so every spike is seen against the eye itself.
- EffectWispy: a broad level top through the middle, with strands stepping above it.
- Where everyone strugglesThe gaps are the effect. Fill them in and you have made a plain set with lumps.
Why Why it is laid out this way
Wispy is the one effect where what you leave out matters as much as what you put on, and in single strands there is nowhere to hide that. The map underneath is calm — a wide level top through the middle zones falling away evenly to both corners — and the character comes from a scattering of strands standing a step above it. On a lid with no crease those raised strands are seen straight on, so their height and their angle are decided by what looks right from the front, not from above.
The order the zones go in
- Set the calm line firstBuild the level top across the middle zones and the even falls to both corners. Every raised strand later is measured against this line, so it has to exist first.
- Space the raised strands unevenlyScatter them with no rhythm — two close together, then a wider gap. Evenly spaced spikes read as a pattern, and a pattern is not wispy.
- Keep spikes to one step aboveA raised strand sits one clear step above its own zone. A flat lid has nothing above the lash line for a tall one to align with, so it just leans over the eye.
- Angle them outwardSet the raised strands leaning slightly toward the outer corner rather than straight up. That keeps the eye reading a direction instead of a row of pegs.
- Leave the corner zones plainNo raised strands inside the covered inner corner or on the last short zone. Both are too short to carry a step and too exposed to keep one.
- Look at it from the front lastSit her up. Anything that has folded forward or is standing alone in a bare stretch comes off now, not at the refill.
The length curve on monolid eyes
The drawing has a wide flat top rather than a single peak, and that is on purpose — a broad calm line gives the raised strands something even to stand out from. Both ends drop away at the same rate, so the eye is not pulled left or right and the interest stays in the middle where the lid plane lets it show. Spikes read as texture only while the line behind them is legible.
Where does a wispy map go wrong on monolid eyes?
Deep The physics underneath
A raised single strand is the heaviest object per bond in this whole shape's set. It earns that place or it comes off.
The same map, built four ways
- Classic 1:1
- This cell. Both the calm line and the raised strands are single lashes, so each one is a decision and each one is countable. Nothing is hidden, which is why this version teaches spike placement faster than the mixed ones.
- Handmade volume
- Fine fans would let the level top look fuller without weighing more, giving the spikes a darker line to stand out from. It changes the read from sparse-and-soft to full-and-soft, so ask which one she meant.
- Promade / pre-made fans
- Uniform fans in an effect whose entire value is in not being uniform. They also sit on thicker bases, and on a flat lid a row of identical bases is visible at the roots.
- Woven / clover
- It closes gaps efficiently, and gaps are the point here. If it appears at all it belongs low in the falls, never through the level top.
Spread angle versus weight
Nothing is fanned in this cell, so all the mass sits on each lash's own line and nothing carries a sideways pull — which is exactly why a classic wispy set keeps its shape longer than a fuller one. The trade-off is that the level top can only be darkened by thickening it, and on a flat lid a thickened line swallows the contrast the spikes depend on. Keep the calm line fine and let the raised strands do the work.
What a monolid lash line can carry
- The ceiling here is reached one strand at a time: a raised lash that has passed its limit folds forward on its own while its neighbours look fine, so the set fails as a scatter of strays rather than as a droop.
- A spike carries a full step of extra length on a single follicle, so its reach and its weight both sit above what the zone was planned for. That is the argument for one step and no more.
- Choose the host lash before you choose the spike. In each zone only some strands are stout enough to hold a step, and putting one on a fine lash costs you the spike, the lash, and a visible gap where both used to be.
Where this map fails first
Two separate clocks run on this map. The raised strands go first and go individually — they are the longest things on the lid and they sit forward where a pillow reaches them, so they fold over the eye one by one. The outer fall then thins until the line stops before the corner does. Because the effect is made of contrast, losing a few spikes reads as more damage than losing twice as many plain strands would.
FAQ Common questions
How tall should a spike be on a monolid?
One clear step above its own zone. Without a crease there is nothing above the lash line for a tall spike to align against, so extra height turns into a strand leaning over the eye.
How many raised strands per eye?
Few enough to count, and spaced without a rhythm. If they start looking regular, the eye reads a pattern and the set stops looking soft.
Why is the top of the map flat rather than peaked?
Because the spikes are the high points. A calm, even line through the middle gives them something plain to stand out from; a peaked line would compete with them.
Can I do a wispy set in classic at all, or does it need fans?
Classic works and is the cleanest way to learn it. Fans darken the line behind the spikes, which some clients prefer, but the effect itself comes from the raised singles and the gaps.
Print this page or save it as PDF — the diagrams are drawn to stay readable in black and white on plain paper. Or download the diagrams below as SVG. No account, no fee, nothing to sign. Every file carries this page’s address, so wherever it ends up it can be traced back here.
Teaching from these? The offer, and how to credit it.
Also in: Monolid eyes · Wispy · Classic 1:1
Read next: what makes a lash map wispy rather than spiky · questions clients ask about lash extensions