Monolid Eyes · Squirrel / Fox · Classic 1:1
The squirrel lash map for monolid eyes, built in Classic 1:1 — zone order, where the length peaks, and the point this one usually goes wrong.
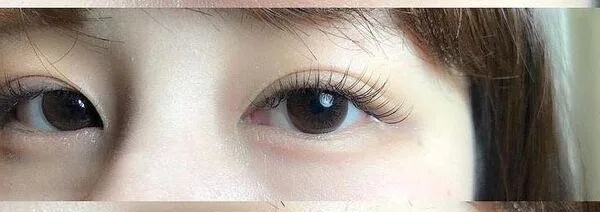
- ShapeMonolid — flat lid plane, and a skin fold covering the inner corner.
- EffectSquirrel: high zone in the outer third, easing down to a soft tail.
- Where everyone strugglesThe inner corner is nearly free of work. Anything you build there is hidden.
Why Why it is laid out this way
Ask around and this is the map that comes back most often for this shape, for one structural reason: its high zone lands in the outer third, past the skin fold at the inner corner and out where the lid plane has opened away from the lash line. Everything it asks for is cheap on a monolid — a nearly bare inner corner, a defined high point where the eye can actually see it, and a tail that comes back down instead of hanging on. Built in single strands it is also the most legible version of the map, which is why it is a good first attempt on this shape.
The order the zones go in
- Find where the corner fold endsEyes open, look at the inner third: the skin fold covers a stretch of the lash line. Everything inboard of that is a write-off, so mark where it stops.
- Keep the inner corner minimalShortest strands on the map, placed sparsely. This is the cheapest zone in the library — do not spend on it.
- Rise steadily to the outer thirdStep up gradually through the middle so the high zone lands past centre, in the outer third. That placement is the whole map.
- Take the curl one step firmerChoose a stronger curl than you would on a creased lid. Without a crease, the lash line points forward, so a curl that looks lifted elsewhere reads level here.
- Ease the tail down, do not cut itStep down after the high zone in two gentle moves. A sharp drop reads as a chopped end; a gentle one reads as a fox tail.
- Check it head-on before the last zoneSit her up and look from the front. If the high zone is not obviously the tallest thing you can see, it is sitting too far in.
The length curve on monolid eyes
The curve climbs slowly, tops out past the middle and comes back down — and on this shape that shape is doing two jobs at once. The slow climb keeps material out of the corner the fold covers, and the high zone lands where a flat lid finally lets a peak stand clear of the lash line. The fall afterwards keeps the outer corner light, so the map reads as lift rather than as length hanging over the eye.
Where does a squirrel map go wrong on monolid eyes?
Deep The physics underneath
One zone on this map carries the effect on its own. Everything below is about what that zone can be asked to hold.
The same map, built four ways
- Classic 1:1
- This cell. A single strand per lash makes the high zone honest — its height is exactly its length, with no fan to flatter it. That also means the peak's fullness has to come from thickness, which a flat lid shows quickly.
- Handmade volume
- Splitting the peak's material into fine strands would give the same silhouette for less load on outer lashes that are already the finest on the lid. That is the case for building this map in fans instead.
- Promade / pre-made fans
- Even peaks in less time, on a base that is bulkier than a single strand's. On a lid with no fold to sit under, those bases stay in plain view at the roots for the whole cycle.
- Woven / clover
- Wide cover per bond, and this map needs height at one zone rather than width across several. Keep it well inboard of the peak, where extra cover does no harm to the shape.
Spread angle versus weight
This cell has no fans, but the peak still has a width, and how wide you build it decides whether it reads as lift or as bulk. Anything sitting off the lash's own line at the high zone twists slowly and blurs the one edge the map depends on. Build the peak narrow and pointing away from the eye, and if you want more presence there, get it from curl before you get it from width.
What a monolid lash line can carry
- The peak is where the ceiling bites: it holds the map's longest strands on lashes that are finer than the middle of the lid, so the first thing you lose is height, not lashes.
- Length at the high zone costs on both counts at once — more mass, and further out from where the lash can resist it. A modest increase there is worth more than a bold one, because a peak that has sagged is worth nothing.
- The peak zone's thinnest lashes decide its length. Sort them as you work: put your longest strands on the stoutest lashes in that third and step down on the rest rather than forcing an even top.
Where this map fails first
The high zone is both the point of the map and its weak spot: longest strands, finest lashes, most exposure. When it settles forward the set does not look thin, it looks level, and level is the exact thing this map was chosen to avoid. The inner corner sits at the other extreme — it is under skin from day one, so nothing there ever visibly fails or visibly works. Build the peak a shade shorter than the maximum so it still reads as a peak after a couple of weeks of wear.
FAQ Common questions
Why is this the map so often recommended for monolid eyes?
Because its high zone falls in the outer third, past the skin fold at the inner corner and out where a flat lid stops covering the lash line. It is the placement most likely to stay visible with her eyes open.
How much should I build at the inner corner?
As little as you can get away with. The fold there covers the lash line, so length and density are both spent on something nobody sees, including the client.
Does the curl really need to be stronger here?
Yes, by a step. A monolid lash line grows forward rather than upward, so the same curl produces less visible lift than it would on a creased lid.
Should the tail be cut short after the peak?
No, eased down. Two gentle steps read as a taper; one big drop reads as a blunt end and loses the soft outer shape the map is named for.
Print this page or save it as PDF — the diagrams are drawn to stay readable in black and white on plain paper. Or download the diagrams below as SVG. No account, no fee, nothing to sign. Every file carries this page’s address, so wherever it ends up it can be traced back here.
Teaching from these? The offer, and how to credit it.
Also in: Monolid eyes · Squirrel / Fox · Classic 1:1
Read next: fox eye and squirrel lash mapping, and how they differ · questions clients ask about lash extensions